While trying to debug, came across this error on items on the watch list: "Cannot evaluate expression because the code of the current method is optimized". Non of the parameters can be 'watched'.
Steps to resolve:
1. Check if the code is really optimized on Project Properties. Also check if debug mode is 'Release'. If those checks are done and still get the same message, go to step 2.
2. Check the config mgr (drop down on the menu somewhere in the center). make sure it says 'debug' and not 'release'.
Friday, December 5, 2008

Tuesday, November 4, 2008
Filter between two dates (date range) with the Data view Webpart
To filter a date range in sharepoint:
1. What you need on a page:
2. Open the page w/ SPD, convert the list to be filtered to DataView (Convert to DataView will give you a lot more columns to choose in the DataView’s Filter critiera, as oppose to going to Insert->Sharepoint Controls->DataView. However, you will still not see a ‘[StartDate]’ and ‘[EndDate]’ when you go to Filter on the DataView's 'Common Date View Tasks'.
3. Now it's time to create the 'StartDate' and 'EndDate' parameters:
Under the DataView's 'Common Date View Tasks', choose Filter, click on the 'Click here to add a phase', scroll down and click on 'Create a new parameter'
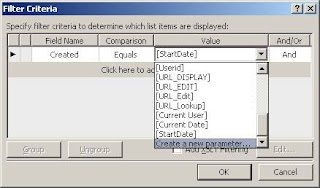
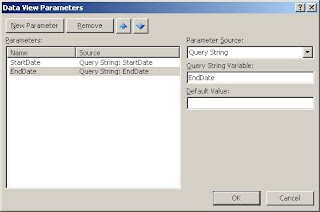
4. Now we are ready to configure the filter for the Date View:
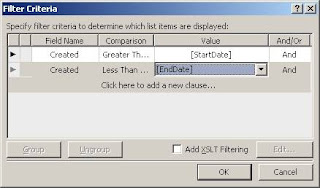
5. In the code view, you should see the newly added parameters:
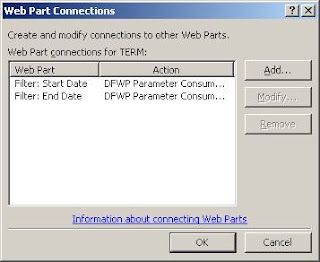
6. Now we need to setup the connections from the DataView so it knows where to get the data for the parameters. Click on the little arrow for ‘Common Dataview tasks’, go to webpart connections (Note: makes sure you choose the ‘Get Parameters From’)
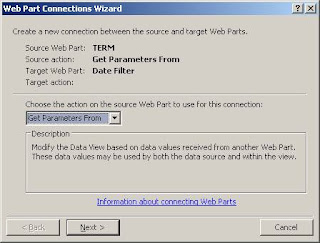
When done going through the Web part Connections Wizard, you should see something like this:
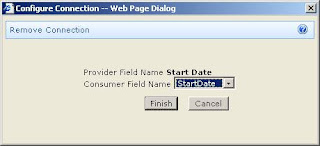
7. Almost done. Now go to the browser and edit page. Click on the date filters to connect the webparts. The Data needs to know where to get the filter values. Even though the connections were setup from the DataView, you still have to setup the filter fields from the Date Filters. Note the consumer field name is the parameter we setup earlier. Do the same for each date filter, one for the 'StartDate' parameter, one for the 'EndDate' parameter.
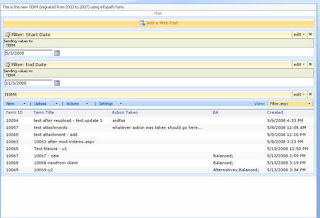
8. Done. Final result could be something like this:
1. What you need on a page:
a. 2 Date Filter webparts
b. 1 list to be filtered
2. Open the page w/ SPD, convert the list to be filtered to DataView (Convert to DataView will give you a lot more columns to choose in the DataView’s Filter critiera, as oppose to going to Insert->Sharepoint Controls->DataView. However, you will still not see a ‘[StartDate]’ and ‘[EndDate]’ when you go to Filter on the DataView's 'Common Date View Tasks'.
3. Now it's time to create the 'StartDate' and 'EndDate' parameters:
Under the DataView's 'Common Date View Tasks', choose Filter, click on the 'Click here to add a phase', scroll down and click on 'Create a new parameter'


4. Now we are ready to configure the filter for the Date View:

5. In the code view, you should see the newly added parameters:
<ParameterBinding Name="StartDate" Location="QueryString(StartDate)" DefaultValue=""/>
<ParameterBinding Name="EndDate" Location="QueryString(EndDate)" DefaultValue=""/>
6. Now we need to setup the connections from the DataView so it knows where to get the data for the parameters. Click on the little arrow for ‘Common Dataview tasks’, go to webpart connections (Note: makes sure you choose the ‘Get Parameters From’)

When done going through the Web part Connections Wizard, you should see something like this:

7. Almost done. Now go to the browser and edit page. Click on the date filters to connect the webparts. The Data needs to know where to get the filter values. Even though the connections were setup from the DataView, you still have to setup the filter fields from the Date Filters. Note the consumer field name is the parameter we setup earlier. Do the same for each date filter, one for the 'StartDate' parameter, one for the 'EndDate' parameter.

8. Done. Final result could be something like this:

Tuesday, October 28, 2008
Cannot find wss feature.xml snippet...
To get the snippet for wss workflows:
Using the Code Snippet Manager (if not seen, Ctrl-K, B or Tools -> Customize -> Commands, Tools, drag the Code Snippet Manager to the Tools menu), add c:\program files\microsoft visual studio 8\xml\1033\snippets\Windows SharepointServices Workflow to get the deployment xmls for the workflow (feature.xml, workflow.xml etc).
Using the Code Snippet Manager (if not seen, Ctrl-K, B or Tools -> Customize -> Commands, Tools, drag the Code Snippet Manager to the Tools menu), add c:\program files\microsoft visual studio 8\xml\1033\snippets\Windows SharepointServices Workflow to get the deployment xmls for the workflow (feature.xml, workflow.xml etc).
Monday, October 27, 2008
SmartPart: could not load
Problem: After adding a SmartPart on a webpart page, go to select a user control in the dropdwn of the tool pane, some user controls show 'Could not load '.
Soln: Select the user control anyway and click 'Apply', this would provided a detailed error message as to what's wrong. If there is a missing assembly reference (if the UC references it, but missing from web.config etc), then add the assembly reference to the web.config.
Soln: Select the user control anyway and click 'Apply', this would provided a detailed error message as to what's wrong. If there is a missing assembly reference (if the UC references it, but missing from web.config etc), then add the assembly reference to the web.config.
Friday, October 24, 2008
SPD does not open file
Installed a fresh copy of Sharepoint Designer on a new VM. Connect to the site with no problem. See all the files. However, when double-clicking to open a file, NOTHING HAPPENS! Very intruging.
Soln: Must activate the copy of SPD! They are not kidding when they say 'some features are not available'....why not just say 'you can't open the files unless you activate the software' or 'you need to activate NOW'....duh
Soln: Must activate the copy of SPD! They are not kidding when they say 'some features are not available'....why not just say 'you can't open the files unless you activate the software' or 'you need to activate NOW'....duh
Thursday, October 23, 2008
Allow anonymous
To enable anonymous to a moss site:
First enable it on Central Admin -> Application Management -> Authentication Providers, choose the zone, check 'Enable anonymous access'. This does not yet allow an anonymous user to the site itself though. Must also ALLOW anonymous on the site itself: Site Settings -> People and Groups, on the left nav choose 'Site Permissions'. On the Permissions list, 'Settings' -> Anonymous Access, choose the 'Entire Web Site' radio botton....
First enable it on Central Admin -> Application Management -> Authentication Providers, choose the zone, check 'Enable anonymous access'. This does not yet allow an anonymous user to the site itself though. Must also ALLOW anonymous on the site itself: Site Settings -> People and Groups, on the left nav choose 'Site Permissions'. On the Permissions list, 'Settings' -> Anonymous Access, choose the 'Entire Web Site' radio botton....
Wednesday, October 22, 2008
Take out the need for approval before publishing page
Just messing around with the Publishing Portal on my local VM. I decided I don't need to approval my own changes so I decided to take out the approval feature:
Go to the 'Pages' document library -> Document Lirary Settings, remove the workflow. Now there is a 'Publish' button when i going back to the page I was working on.
Go to the 'Pages' document library -> Document Lirary Settings, remove the workflow. Now there is a 'Publish' button when i going back to the page I was working on.
Wednesday, April 16, 2008
infopath dataconnection: AllowOverWrite="0"
If you don't allow overwrite of the form with the same name, it would cause an error 'an error occurred while submitting the form' if there exists an infopath form of the same name.
Soln: use the now() function to make the filename unique. cheesy but a quick fix if you don't care about the name.
Soln: use the now() function to make the filename unique. cheesy but a quick fix if you don't care about the name.
Wednesday, March 12, 2008
After updating Infopath Browser Enabled Form Template, new field became read-only on old/existing forms
Problem: After updating Infopath Browser Enabled Form, the newly added field became read-only on old forms. If you open the existing forms in notepad, you will not see your new field in the xml.
Soln: This happens when you choose 'Do nothing' on version upgrade. To make the fields selectable/editable, republish the form with the following options. Go to Tools -> Form Options -> Versioning -> On version upgrade, choose "Automatically upgrade existing forms". Once the new version is uploaded in Central Admin, go back to your old forms, you should see your new fields as editable.
Soln: This happens when you choose 'Do nothing' on version upgrade. To make the fields selectable/editable, republish the form with the following options. Go to Tools -> Form Options -> Versioning -> On version upgrade, choose "Automatically upgrade existing forms". Once the new version is uploaded in Central Admin, go back to your old forms, you should see your new fields as editable.
Wednesday, March 5, 2008
Moss - importing profiles from Active Directory
While trying to configure import user profiles from AD, encountered the following warning message:
'This directory service setting has not been validated because the current user is not authenticated to the directory. It may be a valid setting. Do you want to save this directory service connection setting?'
This could happen when in configurating the Import Connection, 'Use Default Account' is selected. This default account refers to the application pool account. If this is a local account user profiles cannot be imported. In the Authentication Information section in the bottom of the Edit Connection page, click 'Specify Account' and specify a domain account. Go back to the 'User Profiles and Properties' page and 'Start full import'.
'This directory service setting has not been validated because the current user is not authenticated to the directory. It may be a valid setting. Do you want to save this directory service connection setting?'
This could happen when in configurating the Import Connection, 'Use Default Account' is selected. This default account refers to the application pool account. If this is a local account user profiles cannot be imported. In the Authentication Information section in the bottom of the Edit Connection page, click 'Specify Account' and specify a domain account. Go back to the 'User Profiles and Properties' page and 'Start full import'.
Subscribe to:
Posts (Atom)